|
Red LED Flashlight Modification |
|
|
|
A simple replacement for the existing lamp capsule in the
flashlight. Good for Red, Yellow, and Green LEDs. Uses the
lathe. |
| While I
was prospecting for a new bulb for the flashlight, I found that the local
suppliers no longer carried the flashlight, let alone the bulb assembly.
I found that to be rather annoying. The original flashlight has a
plastic lamp assembly with a metallized plastic reflector. The bulb is
hard wired into the assembly, making replacement rather difficult.
Since I was annoyed, and it was time for a project, I picked
the brightest LED I could find. Now I do have both white, blue, and UV
LEDs as well as the standard complement of red, yellow, and green. The
main difficulty is that the flashlight uses 2 AAA batteries, and that means
that we get 3.0 volts. This will do a good job on red, yellow, and
green LEDs, which have a forward voltage of roughly 1.6 to 2.6 volts, but do
a miserable job on white, blue, and UV LEDs. Looks like this design is
going to be good for the red, yellow, and green ones. I could always
add another battery, but that might be a bit more effort than I want. |
 |
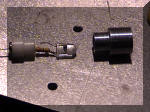
First, a picture of
the original lamp assembly. it's the lower one. The bits and
pieces of the new assembly are around it. |
 |
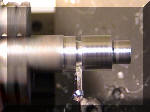
First, turn down
the outer diameter of the lamp assembly. Next turn down the minor
diameter for the neck portion. Not shown, but needed, is a hole
through the whole assembly (and this is not that hole being drilled) that
fits the outside of the LED, but is not big enough for the flange.
Next, and this is what you see, you counterdrill the hole. This is a
1/4 inch drill which takes you roughly to the beginning of the wide part.
The neck is sized the same as the existing neck, you have to use the
existing spring and washer. |
 |
Pick the desired
length of the large section, then use the parting tool to cut the assembly
off. At this point, also not shown, you reverse the lamp holder in the
lathe, then countersink the hole with a countersink. This will provide
a reflector. It's conical, and not parabolic, but it will do as a
reflector for now. |
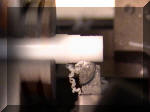 |
Take a 3/8 rod of
Delrin, then cut down the outside so that it is the diameter of the smaller
part of the lamp housing. |
 |
Drill and tap the
center section for 6-32. Make the tapped part deep enough to go
through the entire assembly. You want the stepped portion to be about
0.15 long, and the overall length will make the assembly the same length as
the whole light assembly. |
 |
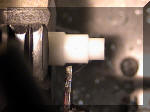
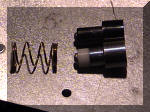
This is one with
the neck too short, and the delrin section too long. Built this way,
it leaves less space inside the assembly for resistors and connectors than
you want. (especially if you want to put a regular bulb in there). |
|
|
The center contact
is made from a 6-32 brass screw. Turn the head roughly flat, and drill
down the center of the screw with a #52 drill. That will be a space
for the lead from the resistor. |
 |
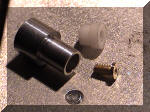
Here's how the
thing goes together. The first one that I built allowed for not enough
room for an incandescent lamp, but enough for the LED. Note that the
screw has been cut down considerably in length. The LED cathode lead
is pinched between the delrin and the aluminum reflector. There is a
small flat filed on the delrin part to give space to the lead. |
 |
The upper is the
original assembly, the lower one is the new assembly. |
 |
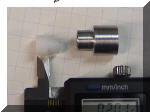
The slightly
redesigned and repositioned lamp assembly. Note that the delrin
section is much shorter, the fat part is only 0.1 inch long, the whole
delrin piece is about 0.25 inches. You can clearly see the hole
through the brass screw. |
 |
Well, here it is,
properly working. Even through the light looks white, it isn't, the
camera is just a bit overloaded here. |
|
The flashlight that all this goes into. |
|
Overall, an easy and
quick project. I'm limited in color choices by battery voltage, but
overall, the light, at 5000 mCD is not doing badly at all. I'd prefer
white, but that's another project. |


