|
Flashlight |
|
|
|
A replacement for a broken flashlight body. Uses the mill
and the lathe. |
 |
I generally carry around a small
flashlight, which has proven itself very valuable when poking around the
insides of computers. I recently discovered a Xenon lamp flashlight that is
significantly brighter than the Maglight I have had for a while.
Unfortunately, the thing broke.
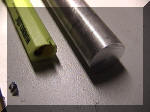
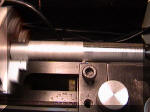
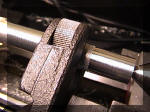
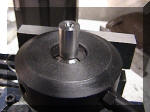
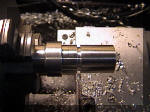
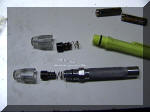
The reason the end broke is that the inner bore of the plastic body is
off center, as you can see in the photo above. It has made the handle quite
thin on one side.
I was looking at that handle, and thought “I can make one of these!”
So I started out with a piece of 3/4 inch diameter aluminum rod about 6
or 7 inches long.
|
 |
The broken piece was only a
quarter of an inch long, so it wasn’t much of a problem. I decided that I
could modify the design a bit, but some parts had to be exact. That small
|T| indicates roughly where the taper will be.
|
 |
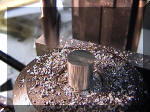
I can’t do much with this rod at
this point, it simply doesn’t have enough support. You can see how long it
is in comparison with the diameter. Time for the live center and the
centering drill. I could finish the end just a bit, but it took some very
light cuts to smooth the end.
|
 |
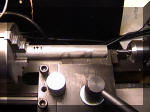
Ready to drill the center hole.
The adjustable toolpost allows very nice centering of the lathe tool for
finishing, and the camlock tailstock is a real convenience. I’ll drill the
next hole 1/4 or so inches deep. It needed to be about 27/64, really. That’s
the size of a AAA battery. This uses two in series. |
 |
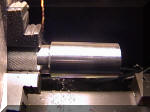
Basic machining here: I’m taking
a truing cut down to the beginning of the taper. That will serve as a
reminder of how far to do the machining. I have a bit of slop, so if I run
over by a few thousandths, it won’t matter. In fact, only one length and the
screw threads are really critical. |
 |
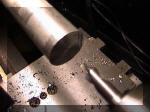
The piece after the truing cut
is done. |
 |
Reality check time. The taper is
in the right place, the handle is longer than needed, but does take into
account the center drill and live support hole. The diameter has been turned
down to the distance across the points of the octagonal handle, not the
distance across the flats. Thicker was better. It’s about 0.600 inches. |
 |
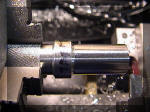
The center hole is bored as
deeply as it can get on the lathe, which is about half of what it needs to
be. I could have continued with finishing the hole, but I decided to knurl
the handle first. I left about half an inch at the base, and went up to
within 1/4 inch of the taper. Here’s the knurling tool ready to start. |
 |
I used the power feed set on
fine, with the lathe on low speed to knurl. I adjusted the tension on the
scissors knurling tool so that the knurling pattern was distinct across the
width of the tool. I then engaged the power feed and the knurling tool crept
across the handle. |
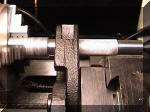 |
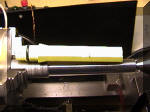
Here’s the maximum extent. The
larger part is actually the more difficult part to machine, but that’s OK.
When the lathe reached the end of its travel, I stopped it, reversed the
carriage feed, tightened the scissors a bit, and let it go in reverse. The
lathe speed was probably about 20 RPM at the maximum. |
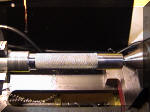 |
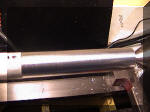
Here we are, completely knurled. |
 |
Another reality check. The
knurling covers most of the handle, and I have enough aluminum at the end to
take care of all the machining I need. |
 |
I’ve put the body in a 5C collet
fixture to mill off the center drill hole. I could have used the lathe, but
the larger part does not fit in the center bore. This holds the body more
securely, and the large part still fits in the collet body. The collet jaws
won’t mar the finish. |
 |
I’ve removed the hole, and the
end is quite flat. I then put it back into the lathe, large end first (the
way it was) and very carefully beveled the sharp edge. I also then rounded
it with a file, so there’s no danger of getting cut. The rounded edge is
also much more durable. |
 |
Here’s the body, reversed, with
the first truing cut taken. I have some room here for slop in truing the
stock, but it doesn’t matter as long as I have enough aluminum for the walls
and to thread. I may not cut that taper, since there’s another possible
design.
|
 |
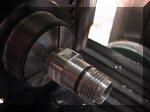
I’ve turned the threaded part
down to the proper diameter for the section before the thread. The large
chunk in the middle will be the taper, or perhaps not, as I wish. The handle
barely fits in the chuck, so perhaps knurling could have waited, but it did
fit. |
 |
Oh, and before it escapes, the
center hole was finished by drilling down the existing hole. At the very
bottom, I drilled 1/8 inch, then brought the drill up to clean away the
chips, then repeated that. The fixture is mounted on a base plate that
automatically aligns the collet fixture with the mill.
|
 |
The next item is to cut the slot
for the O-ring. That seals the interior of the flashlight from water and
contaminants. I’m using a cutoff tool to cut a slot. I’m also just following
the dimensions here as needed. |
 |
Setup and ready to thread, at
least to start. I did some threading with the tool positioned at a 90 degree
angle to the work without the compound set at 29.5 degrees. This started to
work, but was producing some rough threads.
|
|
Ready for threading, the autostop is installed above, and
turns off the motor when the end of the thread groove has been reached. You
won’t thread into a shoulder this way. The thread was 18 TPI, and 0.550 in
diameter, if I remember it properly. It was also a bit square on the top of
the threads. |
| Next, I
tried the proper method, offsetting the compound by 29.5 degrees and setting
the tool with my (non-existent, it’ll be on my shopping list) threading
gauge. This produced better results, but the aluminum (6061) did gall a
little.
I used a little tapfree fluid, and that helped some. However, there was a
problem. As the compound is advanced, the end point of the thread changes
slightly, and the autostop sensor needs to be reset. The next time, I think
I’ll set it a bit short, then let the progression work as needed.
Most of the junk from the threading was on the top, so I did trim it off
to the right diameter, making the tops square. The bottoms are a V groove as
expected. If the setup is right, then even threading aluminum is easy
enough. It will produce clean threads. Sorry, but I was so busy that I
didn’t have time for pictures. But….
|
 |
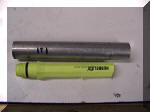
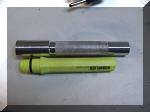
Here’s the reality check,
showing an undamaged plastic body, and the replacement aluminum one.
Everything is done except the taper and the flats. |
 |
Now I could have tried cutting
the flats on an angle, although it would have been a real pain to do.
Instead (and here you can see the threads. The front is cut down to clear
the lens.) I decided to leave them flat. The original flashlight has an
octagonal shape, and I duplicated this to match the molding of the lens. I
milled the 90 degree flats first, then the 45 degree ones. It’s on the 5C
collet spin fixture. |
 |
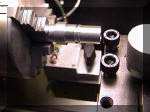
The flashlight body and the
replacement. You can see the flats milled on the body at 45 degree angles. |
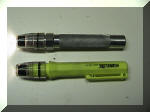 |
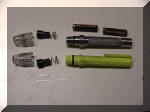
The original (I had a spare
unbroken one) and the replacement. The replacement has new batteries. The
final product, a bit photoedited to eliminate spots on the background. The
non-knurled parts were polished with a buffing wheel on a grinder, which
eliminated the sharp edges on the no-roll part of the octagon. This worked.
|
|
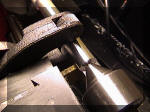
In drilling for the batteries, I had to leave a conical base
to the hole bored in the body. This would have either a spring or some sort
of mechanism to make a good electrical contact to the bottom of the battery.
The lens presses the light assembly down into the barrel and makes contact
that way.
What I did was to make a small conical section of aluminum
that was turned so it barely fit down the barrel. The top was roughened for
a contact, but it was flat. This was press-fit into the barrel so it will
not come out. This makes a nice flat contact on the bottom end of the
battery.
The original body had a bronze spring that made contact on
the bottom and ran up the inside of the barrel. Since this is all aluminum,
I don’t need it.
|
|
 |
|
The machining steps were first to decide on a layout, then cut the bar to
size. Next, the end was faced and center drilled. With the bar supported,
the handle was turned to size and then knurled. The handle was left long to
account for the countersunk hole.
Next, the handle was reversed and the hole for the batteries was drilled,
then finished on the mill because of depth travel problems in the tailstock.
Only goes out so far. However, nothing else had to be absolutely concentric
with this, so any loss of precision was OK.
The top was turned down to the outside diameters needed, threaded, and
trimmed to length. The O-ring was installed in the gap, and flats were cut
on the mill with the spin indexer.
Overall, a nice project with no nervous-making operations. Well within
the capabilities of the lathe and mill. Knurling and flat cutting were nice
extras that helped the design. This took about a day and a half, with a bit
of head scratching about what to do next.
|


